How to Set Up Your SwiftPOS Account: A Step-by-Step Onboarding Guide for Nigerian Retailers
SwiftPOS Team
Published August 22, 2026
Manual record-keeping in retail is a silent killer of profit, often leading to inventory discrepancies, lost sales, and hours wasted on reconciliation. For small-to-medium businesses in Nigeria, these inefficiencies aren't just minor annoyances; they directly impact survival in a competitive market. Moving beyond paper ledgers and basic spreadsheets is no longer an option, but a necessity for growth and profitability.
The Shifting Landscape for Nigerian Retailers in 2026
The Nigerian retail sector is undergoing a rapid transformation. With an estimated 6.1% growth in 2025, according to the National Bureau of Statistics, and a projected e-commerce market value reaching over $15 billion by 2026, the need for efficient, digital operations is paramount. Businesses that cling to outdated methods risk being left behind. Customers expect faster service, accurate stock availability, and a seamless shopping experience, whether online or in-store. Furthermore, regulatory compliance and tax reporting are becoming increasingly complex, demanding precise financial records that manual systems struggle to provide.
A recent report by PwC Nigeria highlighted that over 70% of small businesses in the country face significant challenges with inventory management and sales tracking, directly impacting their cash flow and expansion potential. Digital solutions are no longer a luxury but a fundamental tool for operational resilience and competitive advantage. The ability to track every sale, manage inventory in real-time, and gain actionable insights can be the difference between thriving and merely surviving.
> "In the modern retail economy, data is the new currency. Businesses that can effectively capture, analyze, and act on their operational data will be the ones that succeed and scale."
What You Need Before You Start
Before diving into setting up your new retail management system, ensure you have the following prerequisites in place:
- Reliable Internet Connection: Essential for cloud-based systems and real-time data synchronization.
- Basic Business Information: Your registered business name, address, contact details, and tax identification number (TIN).
- Product List: A comprehensive list of all your products, including names, SKUs (if you have them), prices, and initial stock quantities.
- Pricing Strategy: Clearly defined retail prices for all products.
- Payment Methods: A clear understanding of the payment methods you accept (cash, bank transfer, POS terminals, mobile money).
- Staff Information: Names and roles of employees who will use the system.
- Hardware (Optional but Recommended): A computer, tablet, or smartphone for the POS terminal, and potentially a barcode scanner or thermal printer for enhanced efficiency.
Step-by-Step: Setting Up Your SwiftPOS Account
This guide will walk you through the essential steps to get your retail business up and running with a modern POS and inventory management system.
Step 1: Create Your Company Account
The first step is to register your business and create your primary account. This establishes your unique company profile within the system.
Navigate to the SwiftPOS registration page. You'll be prompted to enter basic company details such as your business name, a valid email address, and to create a secure password. Choose a strong, unique password and keep it safe. After filling out the required fields, you'll receive a verification email. Click the link in this email to confirm your account and activate your trial period. This initial setup takes only a few minutes and is designed to be straightforward, allowing you to quickly move to configuring your retail environment.
Step 2: Configure Company Settings
Once your account is active, your next priority is to tailor the system to your specific business operations. This involves setting up essential parameters that govern how your sales and inventory are processed.
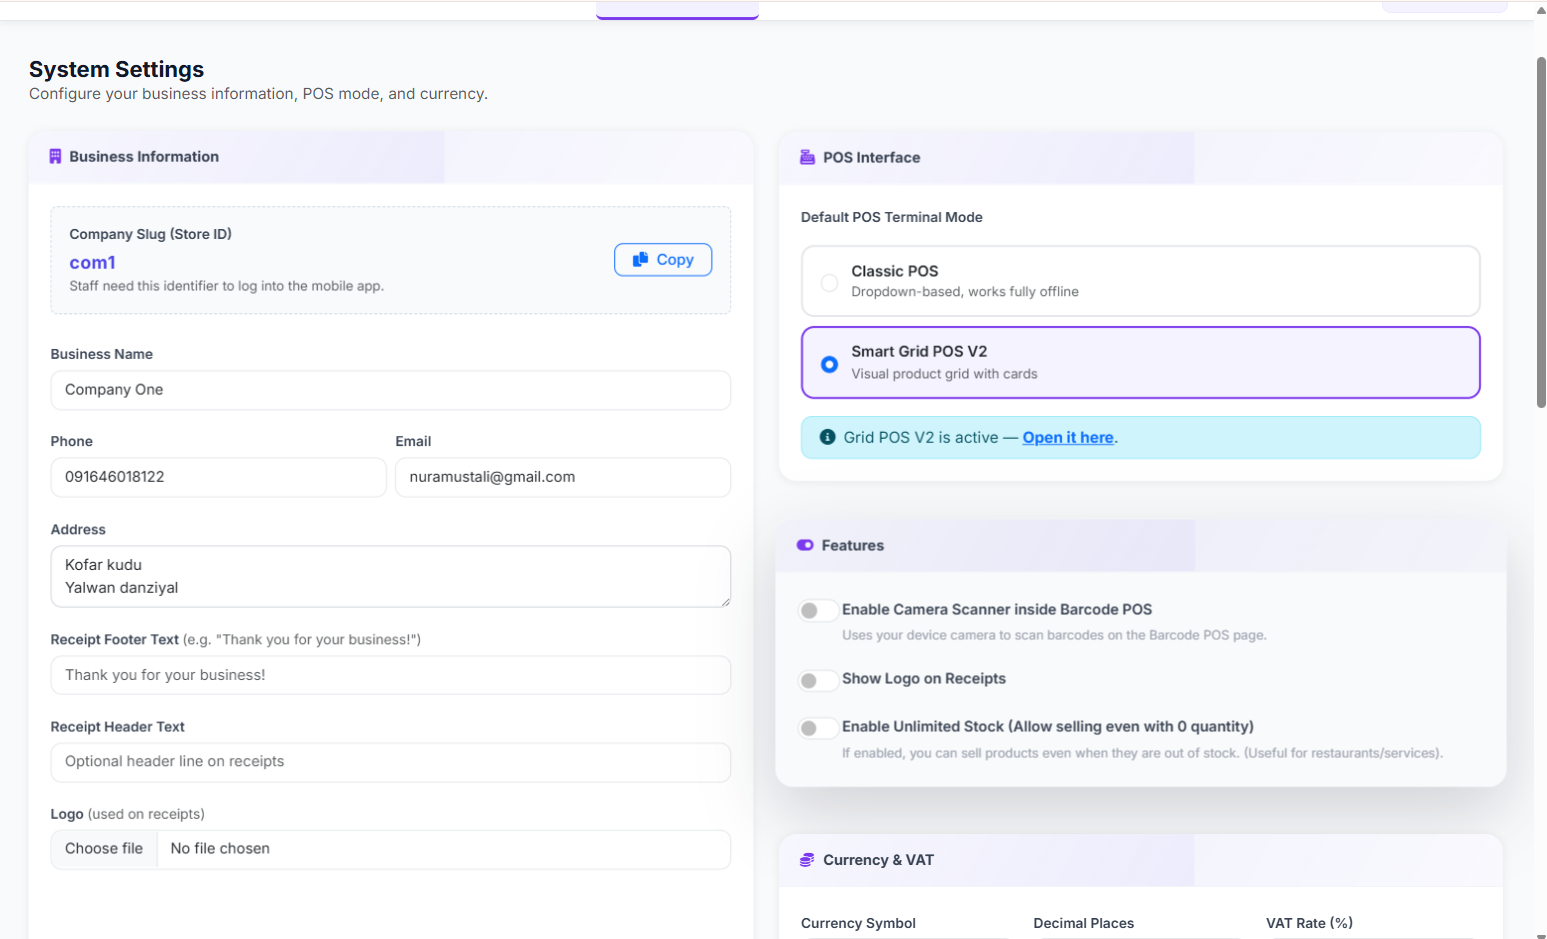
Log in to your newly created account and navigate to the Company Settings section, typically found under the 'Admin Hub'. Here, you can define your local currency (e.g., NGN), set tax rates applicable to your products and services, and choose your preferred POS mode (classic list view or a more visual grid interface). You can also customize your receipt template by adding your company logo and specific terms and conditions. These settings ensure that all transactions and reports accurately reflect your business's financial and operational policies.
Company Settings 1 Descriptive Alt Text
Step 3: Add Your Products and Categories
Populating your inventory is crucial for starting sales. A well-organized product catalog makes transactions faster and inventory management more accurate.
Start by creating product categories to group similar items, such as "Groceries," "Electronics," or "Apparel." This structure will help both you and your staff locate items quickly during sales. Once categories are established, begin adding individual products. For each product, include its name, a unique SKU (stock keeping unit), retail price, and the initial quantity in stock. If your products have variations (e.g., different sizes or colors), you can set up product variants, each with its own stock level. For businesses with extensive product lists, SwiftPOS offers a bulk import feature where you can upload products using an Excel template, significantly saving time.
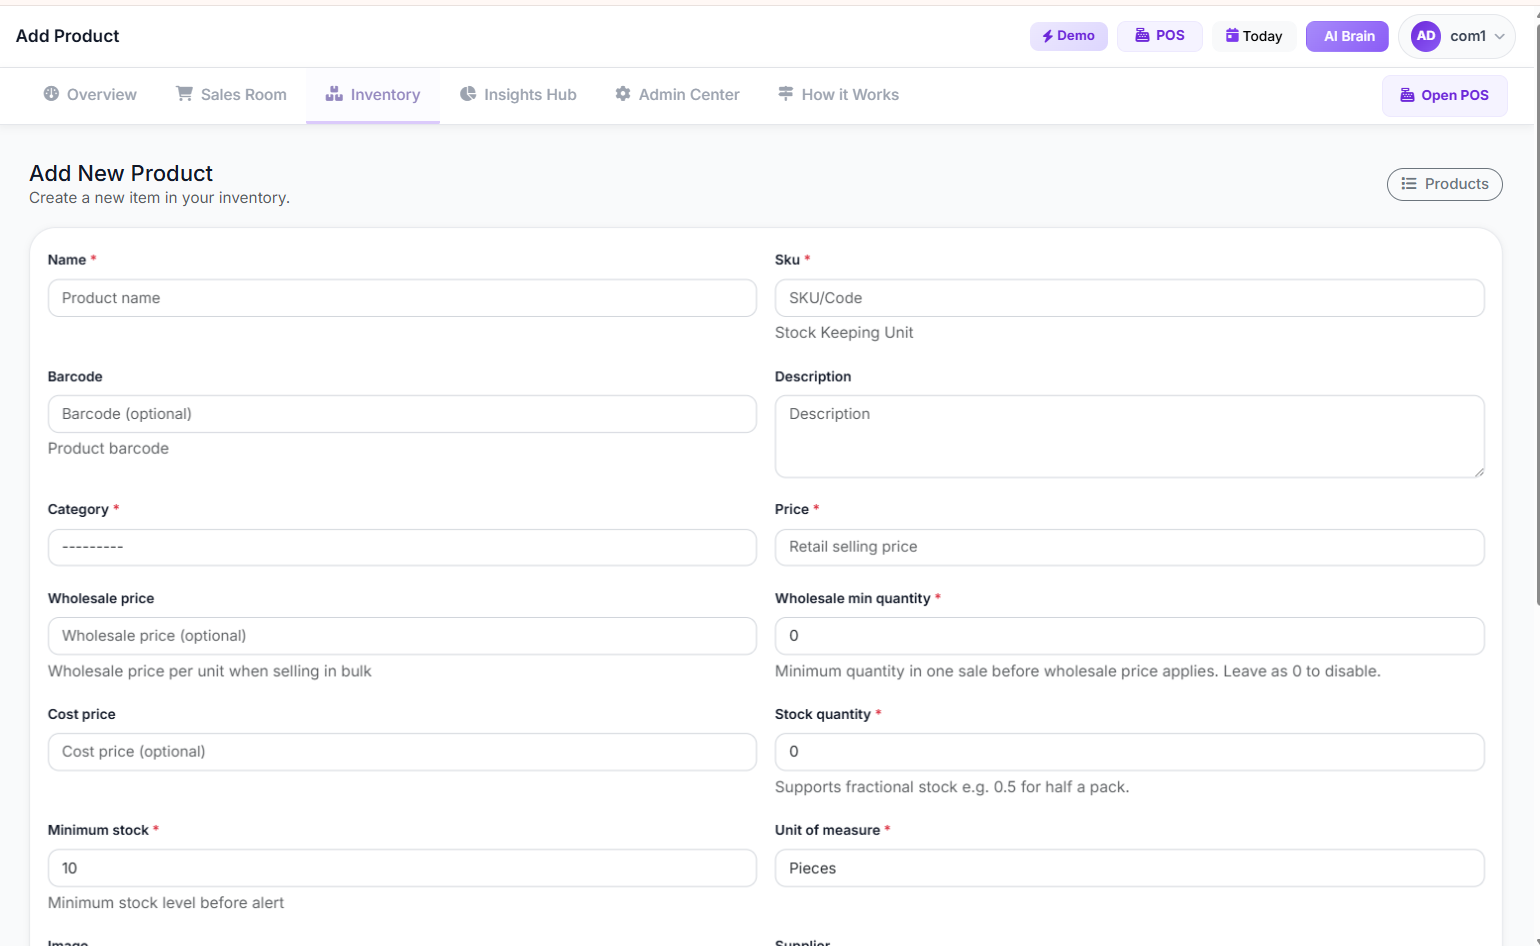 Add/Edit Product Page
Step 4: Manage Your Inventory
Effective inventory management is the backbone of a profitable retail business. This step ensures your stock levels are accurate and you avoid both overstocking and stockouts.
Regularly update your inventory by performing stock adjustments. When new goods arrive, use the "Restock" function to add them to your inventory. Similarly, if items are damaged, lost, or returned, use the "Reduce Stock" feature to reflect these changes. Maintaining accurate stock levels prevents discrepancies and provides real-time data for sales forecasting. Utilize the Inventory Dashboard to monitor your current stock, identify low-stock items, and view overall inventory value. This proactive approach helps you make informed purchasing decisions and maintain healthy cash flow.
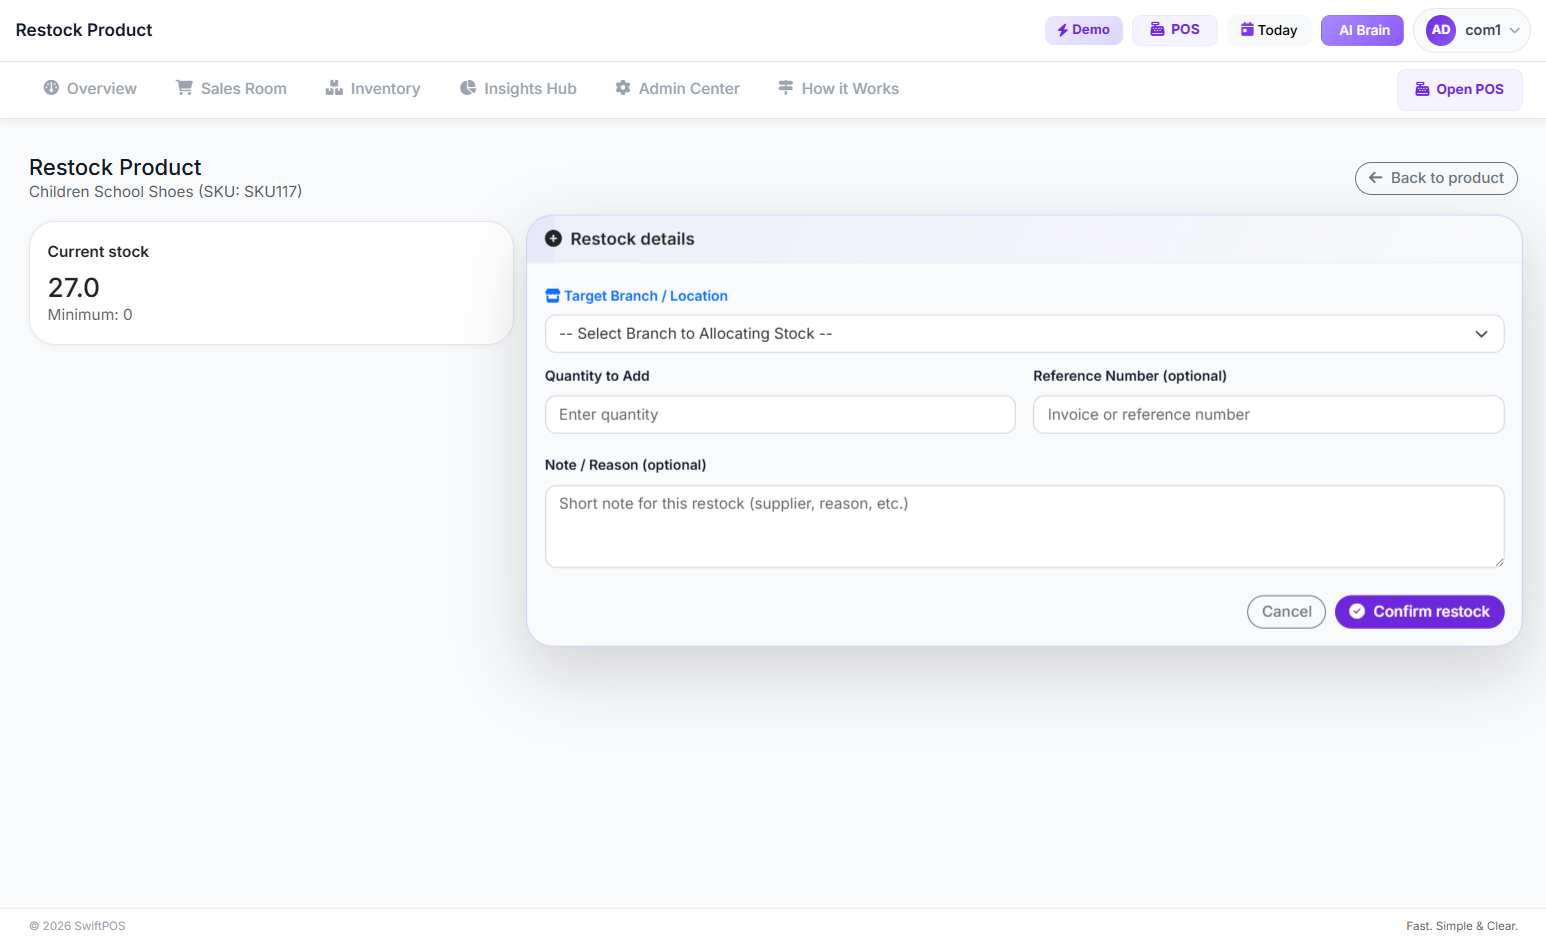 Add product Stock page
Step 5: Set Up Your Point-of-Sale (POS) Terminal
This is where sales happen. Configuring your POS terminal correctly ensures smooth and efficient customer transactions.
Navigate to the Sales Hub and select your preferred POS interface. SwiftPOS offers a Classic POS for a list-style approach, or a Smart Grid POS for a faster, touch-optimized experience. If you use barcodes, the Barcode POS Terminal streamlines the checkout process. Ensure your payment methods are configured, allowing cash, bank transfers, or card payments. For businesses that extend credit, you can also enable credit sales tracking. Training your cashiers on the chosen POS interface is crucial for seamless operations. The intuitive design of SwiftPOS ensures minimal training time, allowing your staff to become proficient quickly.
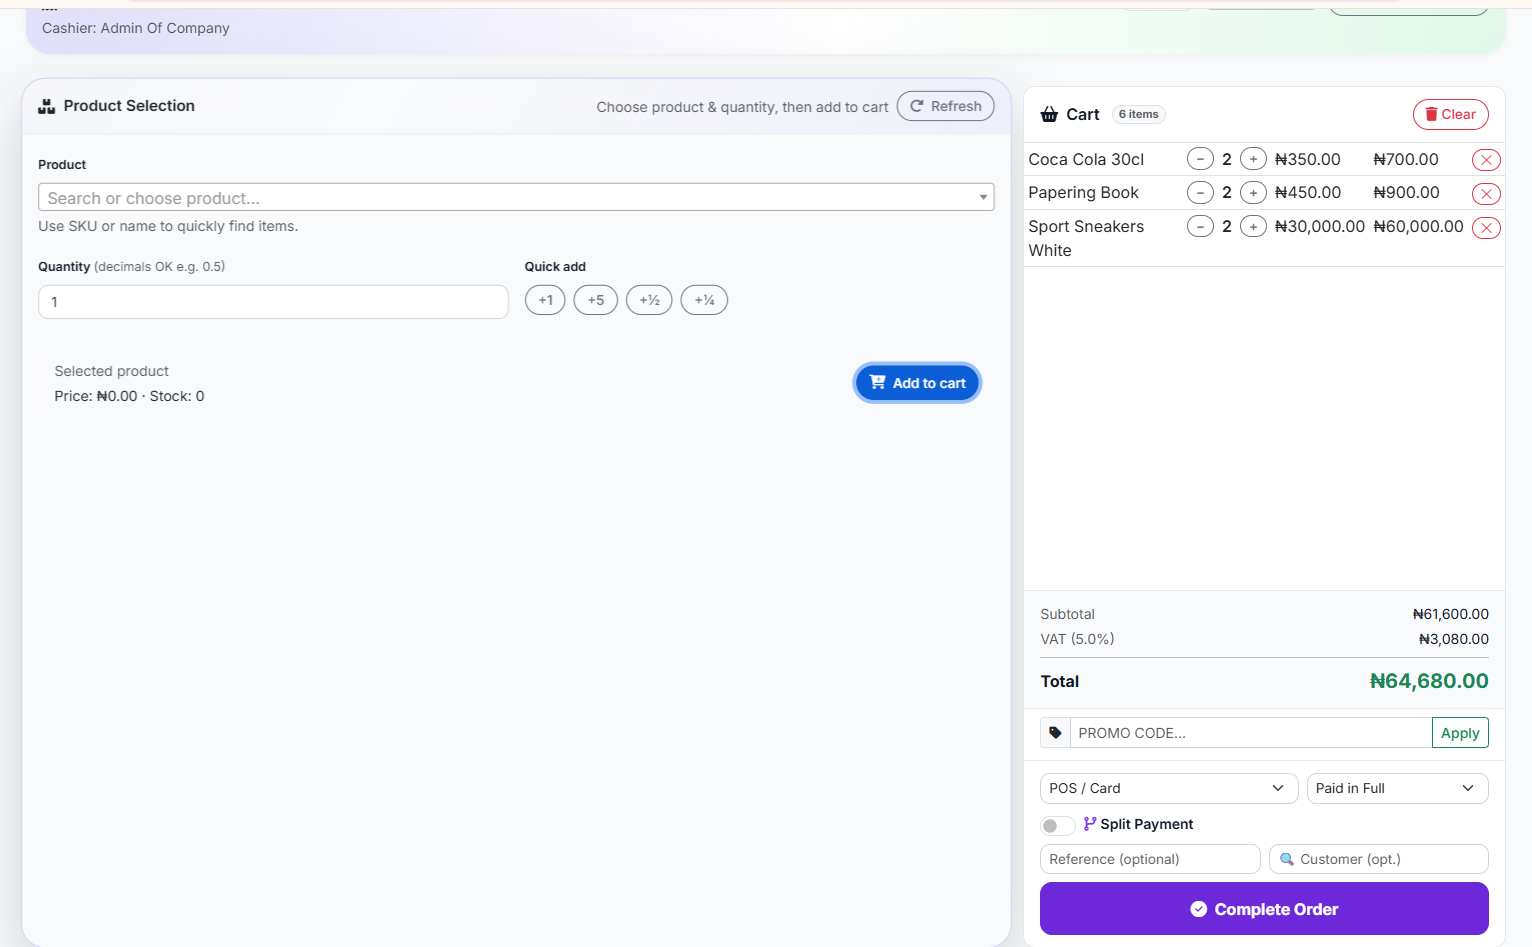 Classic POS Interface (List select)
Step 6: Add Staff and Assign Roles
Your team is integral to your operations. Setting up user accounts with appropriate permissions is vital for security and efficient workflow.
Go to the User Management section within the Admin Hub. Create individual user accounts for each of your employees, assigning them specific roles such as 'Cashier', 'Manager', or 'Admin'. SwiftPOS's robust role permissions manager allows you to define exactly what each role can access and perform within the system. For instance, a cashier might only have access to the POS terminal and their own sales reports, while a manager could oversee inventory, customer data, and broader sales analytics. This granular control protects sensitive business data and ensures accountability.
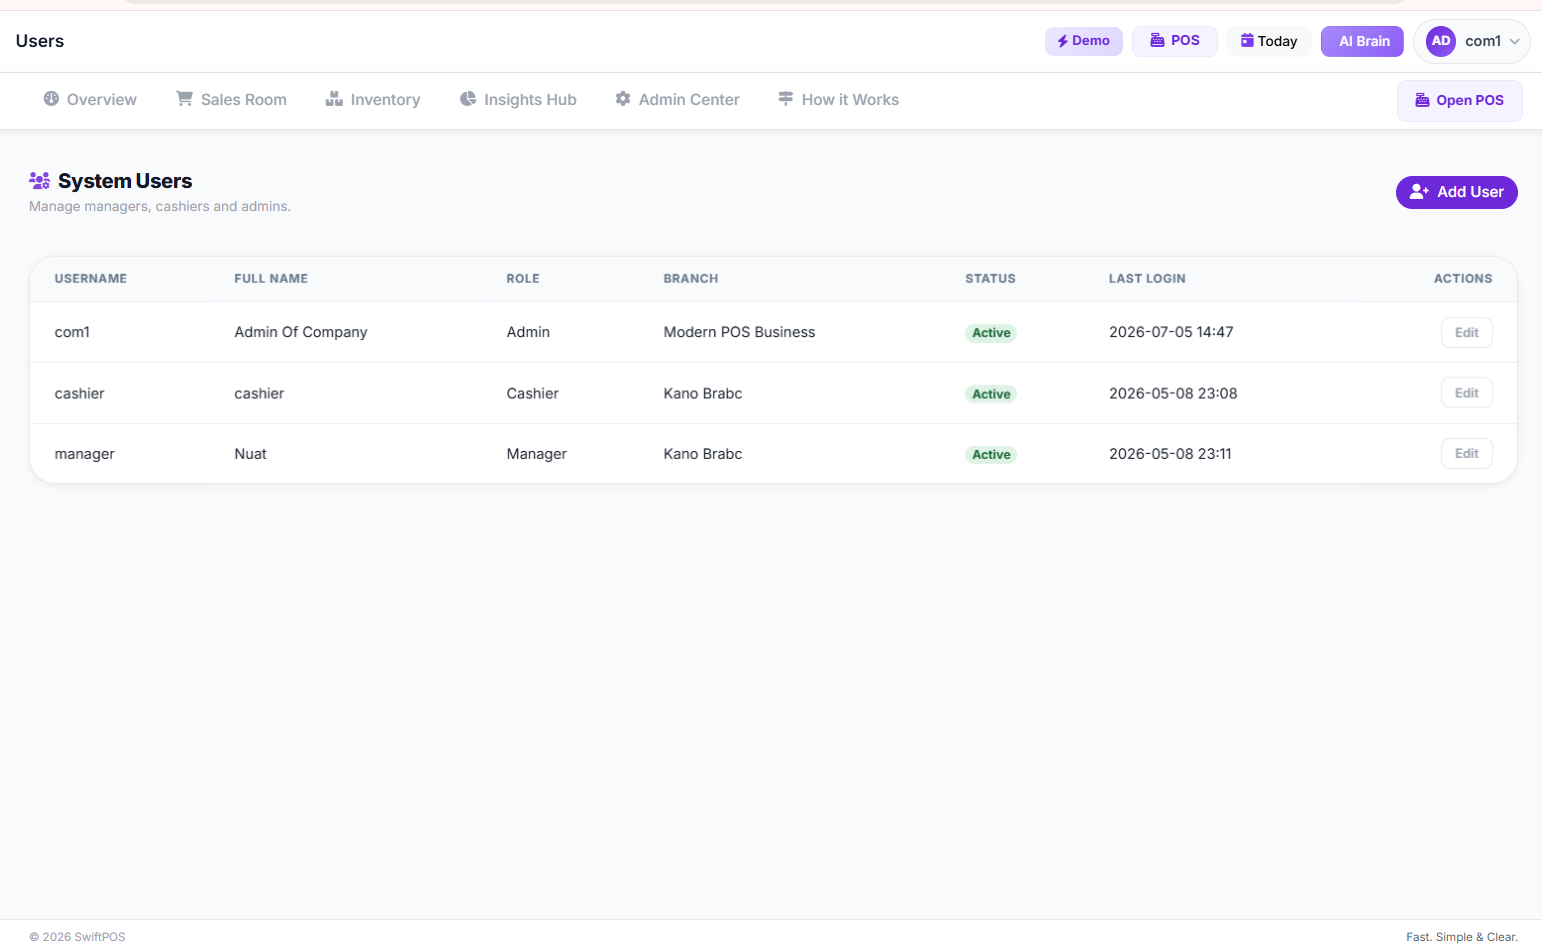 Staff Users Managemnet Page
Step 7: Integrate Customer Management
Building customer relationships is key to repeat business. Use the system to track customer interactions and preferences.
From the Customers List Directory, you can add new customer profiles, capturing details like name, phone number, and email. When a customer makes a purchase, link their profile to the transaction. This allows you to view their purchase history, total spending, and any outstanding credit balances. Effective customer management helps you understand buying patterns, personalize marketing efforts, and provide better service, ultimately fostering loyalty.
Step 8: Define Branches (for multi-location businesses)
If your business operates across multiple locations, setting up branches is essential for centralized management and reporting.
Within the Admin Hub, access the Branch Management section. Here, you can add each of your retail outlets, providing details such as branch name, code, and address. Once branches are established, you can assign staff to specific branches and manage inventory at a branch level. This feature allows for branch-specific reporting, giving you a clear overview of the performance of each location. You can also facilitate inter-branch stock transfers, ensuring optimal stock distribution across your entire operation.
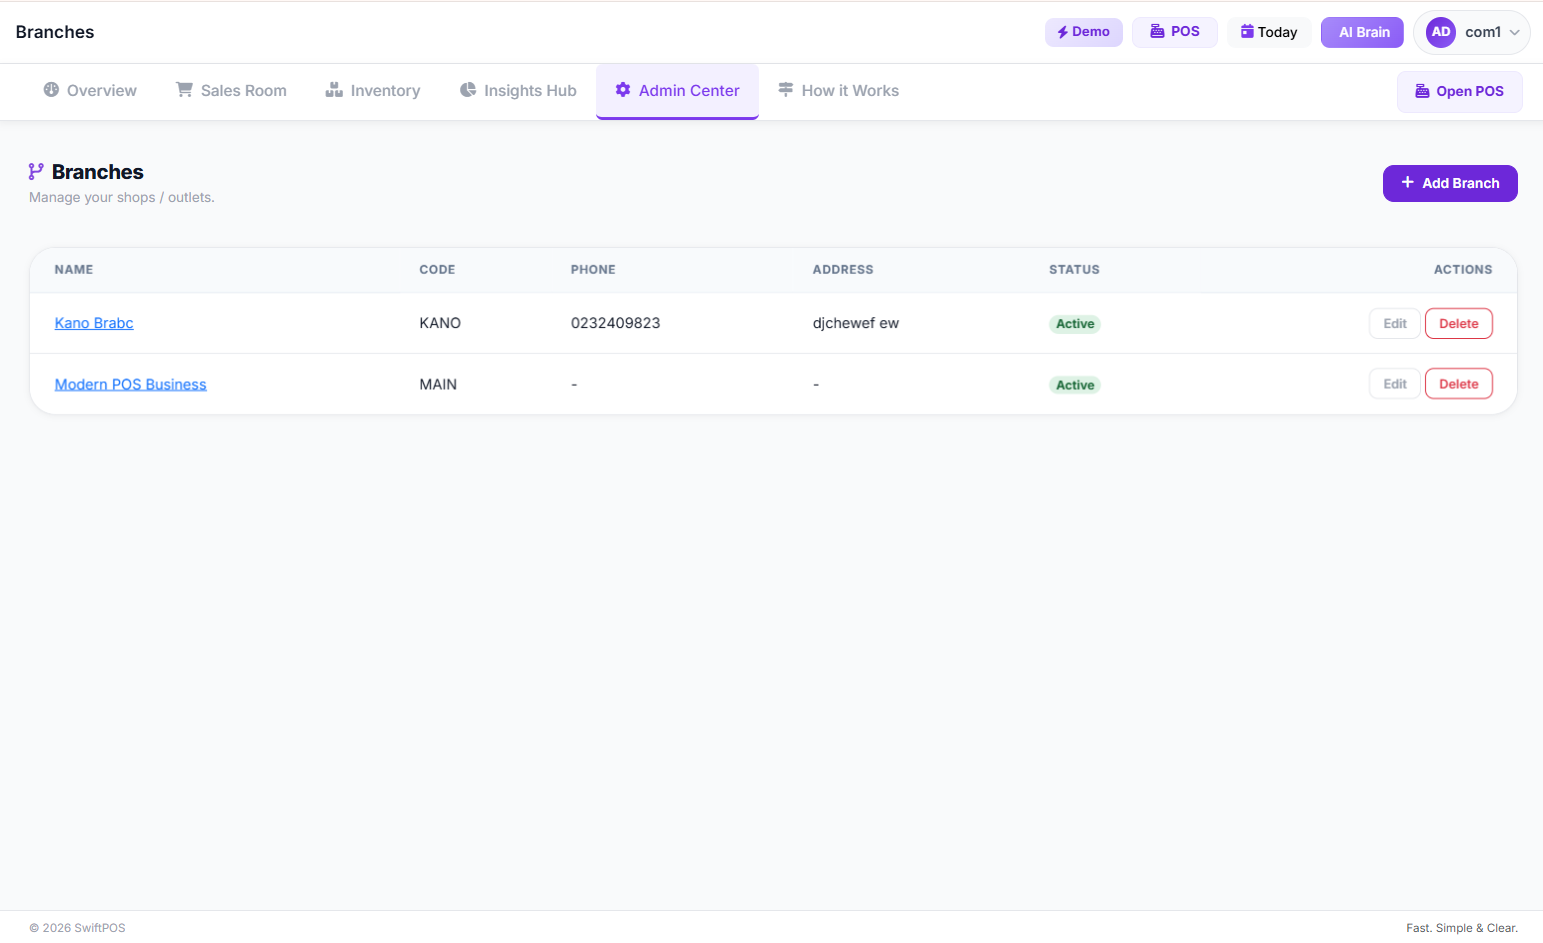 Branch Managemnet List Page
Step 9: Explore AI-Powered Insights
Leverage advanced analytics to make smarter business decisions.
Once your system has collected sufficient sales and inventory data, explore the AI Insights Dashboard. This feature provides auto-generated insights into your sales trends, inventory performance, and customer behavior. These insights can highlight your best-selling products, identify slow-moving stock, and even suggest optimal reorder points. Additionally, the Stock Forecast page will give you predictive data on average daily sales and days to stockout, helping you to proactively manage your inventory. These intelligent tools empower you to move beyond reactive management to strategic planning.
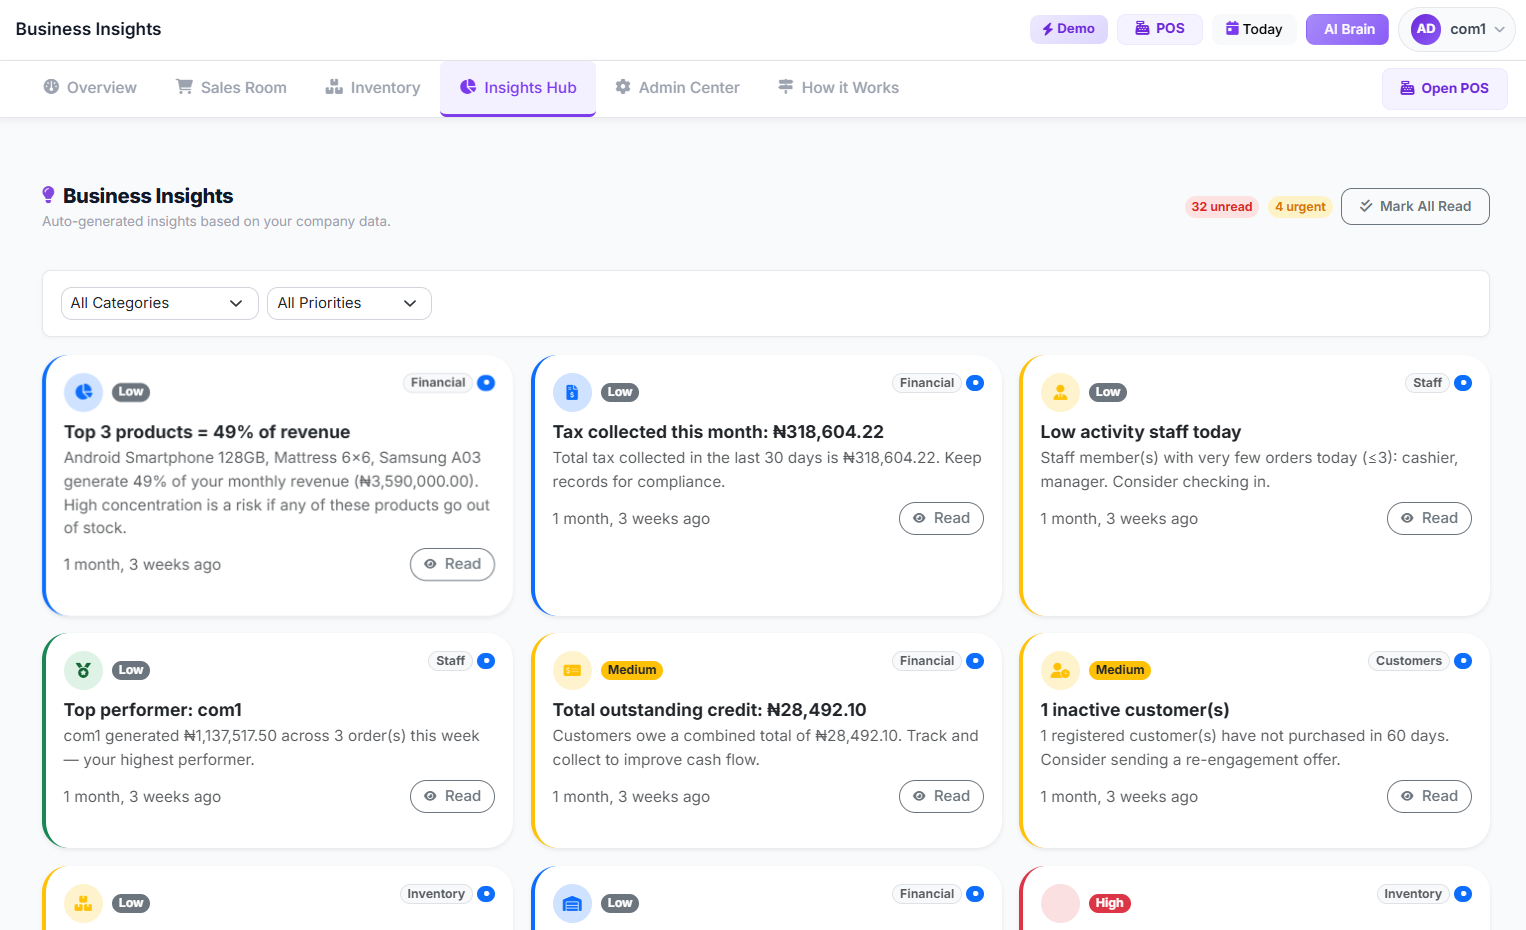 Business Insights Page
 Descriptive Alt Text
Common Mistakes to Avoid
- Incomplete Product Data: Rushing product entry and leaving out crucial details like SKUs, cost prices, or initial stock can lead to inaccurate reports and inventory discrepancies down the line. Take the time to input comprehensive information for every item.
- Neglecting Staff Training: Assuming staff will intuitively understand a new system is a recipe for errors. Invest time in proper training for all users, especially cashiers, to ensure they are comfortable with the POS interface and understand their specific roles.
- Ignoring Initial Inventory Count: Starting with incorrect stock levels will undermine the accuracy of all subsequent inventory tracking. Perform a thorough physical inventory count before inputting initial stock.
- Skipping Regular Backups (for local systems): While cloud-based systems like SwiftPOS handle backups automatically, if you're using any local components or integrations, always ensure a robust backup strategy is in place.
- Overlooking Security Settings: Not setting strong passwords, failing to enable two-factor authentication (2FA) for admin roles, or neglecting to configure granular user permissions can expose your business to security risks. Prioritize data security from day one.
- Failing to Utilize Reporting Features: Many businesses set up a POS but only use it for transactions. The real power lies in the data. Regularly review sales reports, inventory reports, and profit and loss statements to gain actionable insights.
How to Track and Grow After Launch
Once your system is fully operational, the real work of leveraging its capabilities for growth begins. Consistent monitoring and strategic use of data are key.
Regularly monitor your Daily Sales Dashboard to keep a pulse on your revenue, transaction volume, and top-selling products. This immediate feedback helps you identify daily trends and respond quickly to changes in customer demand. Dive deeper into the Sales by Item Report to understand which products are performing best and which might need promotional efforts. For financial health, frequently review your Profit and Loss Report, which provides a clear picture of your revenue, cost of goods sold, and net profit.
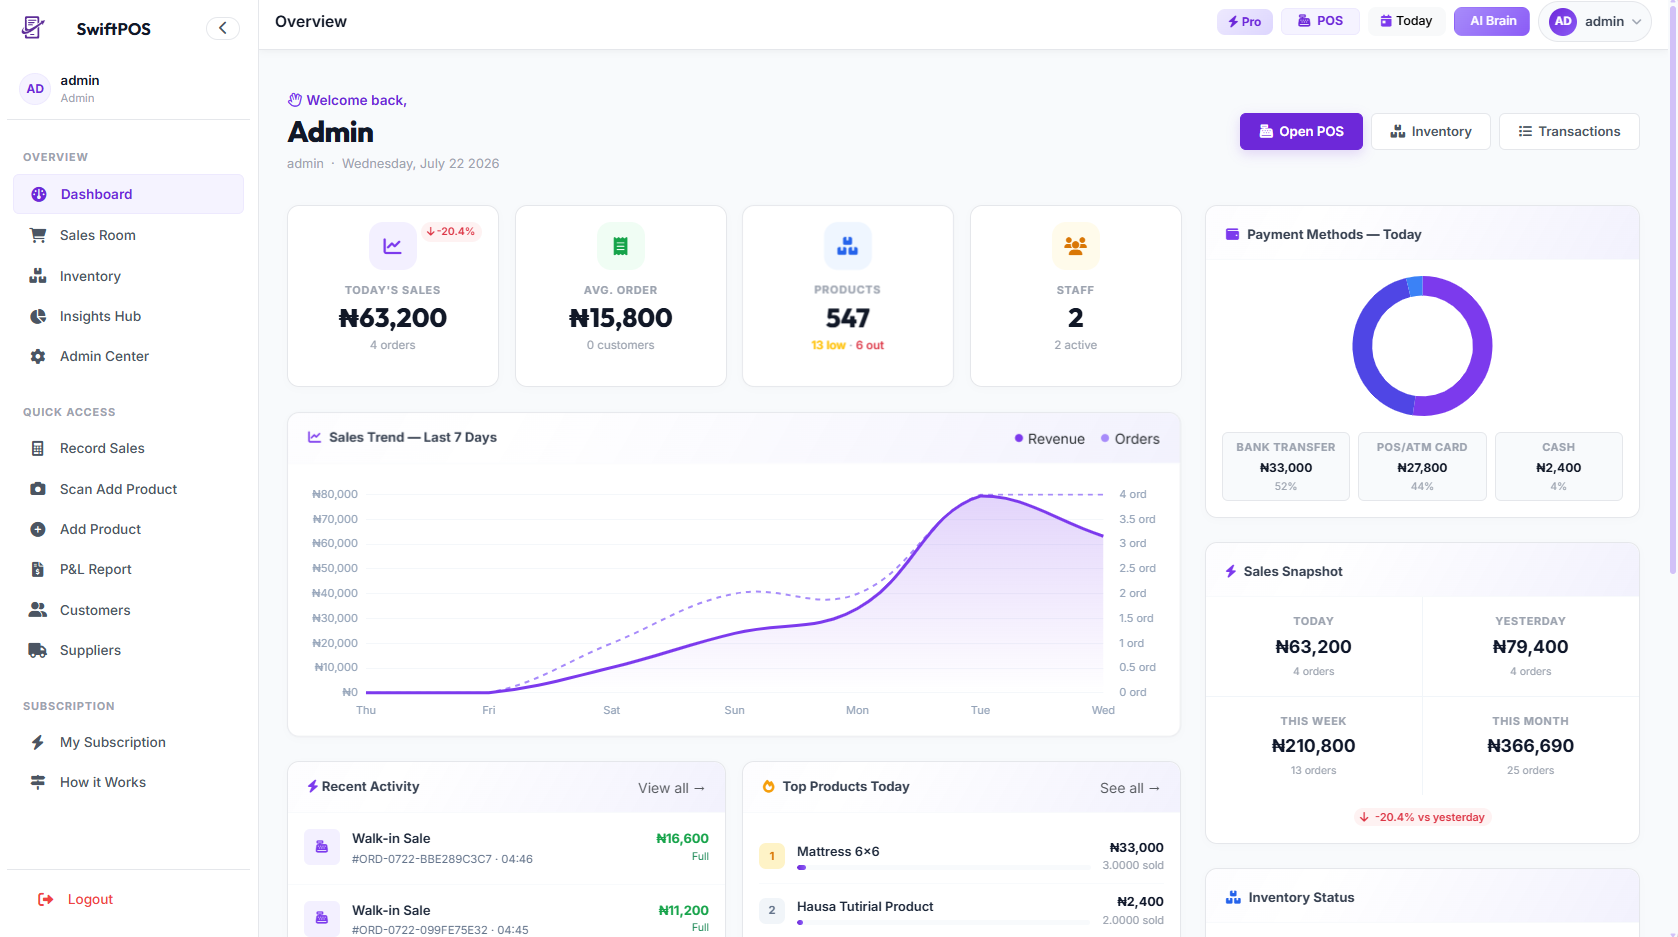 Dashboard Overciew 1:
 Beyond sales, focus on Inventory Dashboard metrics like low-stock alerts and inventory value. This ensures you maintain optimal stock levels, preventing lost sales due to stockouts or capital tied up in excess inventory. Use the Stock Forecast feature to anticipate future demand and streamline your purchasing.
For customer retention, utilize the customer management features to identify your most loyal customers and tailor promotions. SwiftPOS also offers an AI Insights Dashboard that can automatically highlight critical business trends and provide actionable recommendations, helping you make data-driven decisions for sustained growth. By consistently analyzing these reports and insights, you can refine your strategies, optimize operations, and drive your business forward. Explore the full range of features designed to help your business thrive on our features page.
 Descriptive Alt Text
Frequently Asked Questions
Q1: Is SwiftPOS only for large businesses, or can small businesses in Nigeria use it effectively?
A1: SwiftPOS is specifically designed for small-to-medium retail businesses in Nigeria, including supermarkets, pharmacies, boutiques, and more. Its modular nature and scalable pricing plans mean it caters to businesses of all sizes, from single-branch operations to those with multiple locations. The system helps businesses currently using manual or Excel-based record-keeping transition seamlessly to digital management.
Q2: Do I need special hardware to use SwiftPOS?
A2: No, SwiftPOS is accessible via a web browser on any device (computer, tablet, smartphone), meaning you don't need to purchase specialized hardware. While it supports external devices like barcode scanners and thermal printers for enhanced efficiency, they are not strictly required for basic operation. You can even download the SwiftPOS Android Application for on-the-go access.
Q3: How secure is my business data with SwiftPOS?
A3: Data security is a top priority. SwiftPOS employs robust security measures, including multi-tenancy architecture to isolate each company's data, secure login procedures, and granular role-based permissions. Features like 2FA login for admin roles and PIN verification for sensitive operations further enhance security, ensuring your business information is protected.
Q4: Can I import my existing product list into SwiftPOS?
A4: Yes, SwiftPOS offers a bulk product import feature. You can download an Excel template, populate it with your existing product data, and then upload it directly into the system. This significantly speeds up the initial setup process for businesses with extensive inventories.
Q5: What kind of support is available if I encounter issues?
A5: SwiftPOS provides comprehensive support to help you make the most of the platform. This includes detailed tutorials and guides, and dedicated customer support channels. You can also find answers to common questions and learn more about specific features on our blogs page or reach out directly via our contact page.
Ready to Transform Your Retail Business?
Stop losing money to manual errors and start making data-driven decisions. Set up your SwiftPOS account today and experience the difference a modern, AI-powered retail management system can make. Visit app.swiftpos.ng to begin your journey towards smarter sales and streamlined operations.
Contact Details:
WhatsApp: 2349164601810

How to Stop Cash Leakage in Your Business: A Comprehen…
Oct 04, 2026
How to Start a Food Business with Low Capital: A Step-…
Oct 01, 2026
Cost to Open a Mini Supermarket in Nigeria: A Detailed…
Sep 28, 2026